Sunday, November 27, 2016

Day Two - Assembling the shell


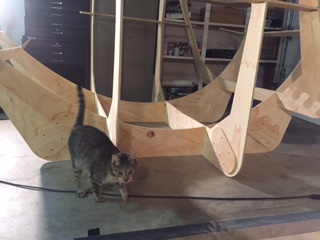
The Operations Manager is inspecting the pace of work...Tuna rations must not be interrupted.


Here is a look at our work space.  The first step in construction is to glue (epoxy) several pieces together to form the beginnings of the outer shell.  This is because the length of the camper shell is longer than the standard cut of plywood (8').  In order to accomplish this, we re-purposed the cardboard box to make a work surface on the garage floor.  We will cover this with plastic sheeting to protect it from the epoxy.


The first of the shell pieces.  As stated before, they must be assembled and glued together in order to achieve the desired length.  This is accomplished using machined puzzle joints, glued together using fiberglass tape.  The wood is Okoume (pronounced "O-Koom-eee") plywood cut into 1/4'' sheets.   This wood is cut from West Africa and favored by boat builders due to its light weight.  This weight advantage, when translated to a camper, will allow a small car to pull it.


This is the first step in gluing the puzzle joints - CLC calls this "tack-welding".  It is little droplets of superglue with a spray of accelerator to harden the glue in seconds.  This holds the joints together while we prepare to cover them in fiberglass and epoxy.


With the tack-welds holding the joints in place, strips of fiberglass tape are cut to length.  As you may expect, fiberglass is exactly that: glass spun into a fine threads and woven into a cloth.  In this step, the cloth is unrolled form a 3" roll, cut specifically for this application.  These will be brushed with epoxy resin and left to cure overnight, hardening the two pieces of wood into one.  The fiberglass/epoxy combination gives the camper it's overall strength, light-weight and seals in the cracks from the elements.


Finished coating the fiberglass covering the puzzle joints in epoxy resin, and left to cure overnight.  These four pieces will be stitched together in the mold to form the top of the camper shell. 


The final results of two days' worth of work:  the completed mold and panels #1 and #2 left to cure overnight.  The temperature needs to be kept between 60-80 degrees for the best possible hardening.  We have monitored the garage temperature overnight and it has not dropped below 55 degrees, even with outside temps already freezing.  To ensure the proper range, we have rigged up a couple heaters and a fan to circulate warm air.  So far, so good - holding steady at 75 degrees! 


Saturday, November 26, 2016

Day One - Assembling the Mold

Assembling the mold frame.  This whole process took less than 2 hours, including two trips to Lowe's to get the proper drywall screws and extra wood glue for the pieces.  The frame is constructed in the same manner as the camper shell itself (see later post) using puzzle joints, reinforced with wood glue and a "butt block" screwed over the joint itself.  The pieces are then assembled in a slot-together manner to form a large frame about 8'x10'x4'.


You can see the Crisis Manager hard at work ensuring everything went smoothly on this first day.  This mold gives the camper "the elegant, flowing shape that is so eye-catching", according to the assembly manual.  In practical terms, however, it enables us to rotate the shell around so we don't over extend ourselves.  The shell plywood of the camper will be stitched to the mold while we glue and fiberglass the seams.


First box - The Mold!

For context, construction of the camper shell begins upside down in a temporary mold built of ordinary plywood in order to "stitch" all the pieces using 18 gauge copper wire, and then glue them together - hence the name for the method: stitch and glue.  Once the shell is constructed and the glue hardened, the mold is removed for sanding.

Here, we opened the first large box for an inventory. All pieces of the mold frame accounted for… Will begin construction in a few hours!

Thursday, November 24, 2016

Freight shipment arrives

The freight shipment was delayed but it finally arrived late last night - just in time for Thanksgiving! The next step is to inventory all the pieces and make sure nothing is damaged... then the Great Winter Project of 2016 will begin!

Reorganization


After a few more supply runs and prepping the shop into a usable work space, we are ready to get the rest of the boxes!

UPS delivers!


We finally received the first boxes yesterday! The total shipment is 6 total boxes: 3 shipped via UPS and 3 ship via freight. We opened the first boxes from UPS (containing the epoxy and fillers). Only one casualty: a bucket of cell-o-fill busted open. Cell-o-fill is mixed with epoxy to create the glue wood to wood. Some was salvaged, but we will have to ask for a new bucket.

Materials gathering!

When we ordered the camper in October, we knew it would would not ship until 17 November. What a painful wait (especially considering the lost weekends!). We were able to get an advance copy of the instruction manual so we could begin to stockpile all the construction materials we would need.  The camper is designed to be built by first time builders, without an abundance of specialty tools.

There are lots of consumable supplies, and we have most everything. Fortunately, we are able to source most of them cheaply from local dollar stores. The only major tool we are lacking is a recommended random orbital sander. That will come later as it is not needed immediately.


Sunday, November 20, 2016

Meet the Project Staff!

Meet our project staff for the Great Winter Project of 2016!  Due to the complexity of the work involved, we had to bring in some additional help to manage the workload.  Unfortunately, budget constraints left us with few options and we were compelled to use alternative methods...

This is Bandit - Operations Manager.
He is a stomach with fur - promoted from his previous role as Food Service Director, 
we are relying on him to keep us on schedule.
This is George - our Crisis Manager.
He is very mellow, and will keep us calm and grounded when we (inevitably) have snags in the construction process.
This is Callie - Chief Feline Officer.
She is the liaison from the Feline Union Local 2404, ensuring working conditions are hospitable for cats - especially food, warm laps, and sunbeams.  Cat Lives Matter!