The Operations Manager is inspecting the pace of work...Tuna rations must not be interrupted.
Here is a look at our work space. The first step in construction is to glue (epoxy) several pieces together to form the beginnings of the outer shell. This is because the length of the camper shell is longer than the standard cut of plywood (8'). In order to accomplish this, we re-purposed the cardboard box to make a work surface on the garage floor. We will cover this with plastic sheeting to protect it from the epoxy.
Here is a look at our work space. The first step in construction is to glue (epoxy) several pieces together to form the beginnings of the outer shell. This is because the length of the camper shell is longer than the standard cut of plywood (8'). In order to accomplish this, we re-purposed the cardboard box to make a work surface on the garage floor. We will cover this with plastic sheeting to protect it from the epoxy.

The first of the shell pieces. As stated before, they must be assembled and glued together in order to achieve the desired length. This is accomplished using machined puzzle joints, glued together using fiberglass tape. The wood is Okoume (pronounced "O-Koom-eee") plywood cut into 1/4'' sheets. This wood is cut from West Africa and favored by boat builders due to its light weight. This weight advantage, when translated to a camper, will allow a small car to pull it.

This is the first step in gluing the puzzle joints - CLC calls this "tack-welding". It is little droplets of superglue with a spray of accelerator to harden the glue in seconds. This holds the joints together while we prepare to cover them in fiberglass and epoxy.


With the tack-welds holding the joints in place, strips of fiberglass tape are cut to length. As you may expect, fiberglass is exactly that: glass spun into a fine threads and woven into a cloth. In this step, the cloth is unrolled form a 3" roll, cut specifically for this application. These will be brushed with epoxy resin and left to cure overnight, hardening the two pieces of wood into one. The fiberglass/epoxy combination gives the camper it's overall strength, light-weight and seals in the cracks from the elements.


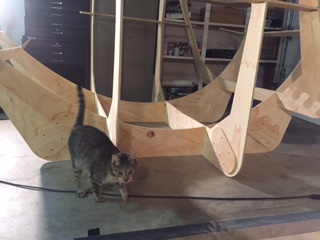
Finished coating the fiberglass covering the puzzle joints in epoxy resin, and left to cure overnight. These four pieces will be stitched together in the mold to form the top of the camper shell.


The final results of two days' worth of work: the completed mold and panels #1 and #2 left to cure overnight. The temperature needs to be kept between 60-80 degrees for the best possible hardening. We have monitored the garage temperature overnight and it has not dropped below 55 degrees, even with outside temps already freezing. To ensure the proper range, we have rigged up a couple heaters and a fan to circulate warm air. So far, so good - holding steady at 75 degrees!

Looking good folks! You'll have this thing on the road in no time. Seriously though, as long as can keep the garage above 50 or 55 you should be safe. Just be sure you give everything plenty of time to cure. You can work with the panels after 24 hours, but keep them warm for a week or so at least.
ReplyDelete