OK, so this entry covers several days' worth of work but it is all one step of the camper construction. This is the step out of the manual:
The puzzle joints went together nicely! The cured epoxy made the fiberglass tape completely hard and stiff. The tape has to be sanded and the excess fiberglass has to be cut off to make the edge smooth.

The next step is to then fit these panels into the frame mold. To do this, we fold the panels over onto each other and stitch them together with copper wire. Then to install them, we open them up like a book. So, we now get to our very first stitch with the copper wire!
The Okoume plywood is flexible enough to bend into shape. The #1 panels form the very top roof of the camper with a seam in the middle. The #2 panels (on the sides) also form part of the roof, but are set at a slightly steeper angle to meet the sides which will be installed later. #1 and #2 are then stitched together with copper wire. In order to hold the shape we need, the panels are stitched directly to the mold itself to help the panels keep the necessary angles.
Inspecting the premises for crises - everything seems fine...but be careful! :)
The challenge now is to seal the seams with fiberglass and epoxy, just as we sealed the puzzle joints. Obviously, we cannot overlay fiberglass into the copper stitches, so we use more drops of superglue in between the wire stitches. The stitches along the seams are removed and the superglue drops sanded smooth to ensure less air bubbles and a good epoxy bond.
After sanding, the seams are primed with some epoxy. This helps the fiberglass tape stay in place.
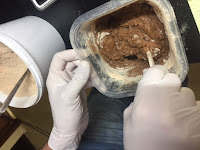
Ok, now things get interesting. Epoxy is a very cool substance. Up until this point we have used pure epoxy resin mixed with hardener which forms a clear adhesive. However, in this project we will mix the epoxy with inert substances to form different adhesives for different purposes. To completely seal the seams, the epoxy is mixed with wood flour to form a sort of mixture with the consistency of peanut butter.
This peanut butter epoxy gives the epoxy different composition. This is squeezed and pressed into the seams using a tool that looks like a fat tongue depressor. This technique is known as a fillet (pronounced fill-it, not fill-ay). The wood flour does not give the epoxy any different chemical properties, but it is necessary to fill in the seams to lessen the angle the fiberglass has to seal. All the fiberglass tape is then soaked with pure epoxy resin and left to harden overnight.
Finished for this step! As I said before... this entry covers several days worth of work. It took one day to stitch the pieces together with all the copper wire. Then a second day to mix the wood flour with the epoxy and soak the fiberglass.


No comments:
Post a Comment