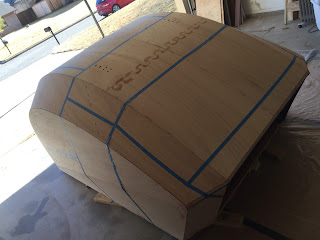
We started with a system to mark out various sections. We learned later that was a poor decision. The tape starting peeling some bits of wood up with it, so we abandoned that system and just went with the panels to judge what was complete and what was not.
 |
Fearful of dust clogging everything we opted to cover all of our equipment. |
 |
| Of course, once we thought protecting our equipment, we thought about protecting ourselves. |
 |
| Sanding selfie! |
Our solution was simply to open the garage door to get all the light we needed. Unfortunately, at the time this occurred it was bitterly cold outside - note the 27 degrees (F)! "Why not just use more work lights?" One might ask. Fair question. It turns out that half of the power outlets in our rental house is supported by one - yes, ONE - power breaker! And all of our outlets are taken up by heaters. We have extension cords running throughout the house to distribute the power loads.
We could only work in 30 minute increments before we had to take a break and warm up our hands. I've never been to Alaska, but friends have told me that they would choose an Alaska -50 over a Oklahoma 32! After a week of sanding in the cold, I am inclined to give Alaska a try...
The manual states to use 80, 120, and 220 grit sandpaper at various parts of the construction process. We had to use 80 grit on all the leaked epoxy. The puzzle joints needed the most attention. Then a full pass with only 120 to get all the grain smooth and ready for fiberglass.
CLC recommends a block sander for some operations, however, we have had less success (or less patience) with that method. Auto sanders all the way! It took a few attempts to be fully comfortable with the random orbital sander. It is very effective though - I can see why CLC recommends them. The key is to go slow and deliberate. It does occasionally run away from you. The danger is that you can cut too deep in some spots, leaving unseen "scars" or "swirls" which you cannot observe by eye.

Swirls wouldn't be so bad if the plan was to paint. However, our goal is to get a good, clean wood finish using varnish like the display prototype. And so, anything we do now will have vast consequences later. To get the wood-finish, we need to do more passes with 220 grit paper. These extra passes will remove swirls (if we have any). If we have any of scars, they will not show up until we fiberglass - and it will be too late to fix. It will look ugly and the only option would be to paint the area with a solid color to cover it up. One trick to gauge how well we are sanding is to use a rag soaked with denatured alcohol to wet the area. The alcohol will give the wood a temporary glossy appearance very similar to what it would look like. Any swirls would be readily apparent:
After sanding the whole camper, we run a shop vac all around to suck up the loose dirt and dust particles. Of course, we use a brush to not scar or dent the shell surface.
Part of the process of sanding requires us to soften all the sharp 90 degree edges formed by connecting two sheets of plywood. Fiberglass will not turn such a sharp angle, so we had to grind those down to a smoother rounded edge. Now, all of these seams are sealed from the inside and we do not want any air pockets weakening the strength of the shell. Therefore, we have to fillet all the outside seams which we were not able to access before.
 |
| A good picture of the wood flour epoxy application. A plastic bag is filled with thickened epoxy. A hole is cut in the corner to make a nozzle for precise application. Just like frosting on a cake. |
 |
| Once the epoxy is dispensed, a flat piece of plastic, called a squeegee, is used to press the epoxy into the seam and remove excess. |
We did screw up one spot. The seam which makes the galley hatch shouldn't be glued to the main shell. We accidentally filled it. Fortunately, we caught the mistake before it was allowed to harden and we scraped it out with toothpicks and Q-Tips. This line will have to cut in a later step to create the door to the galley hatch. It would have been much more difficult to cut had we not realized this critical error.
After all the seams are filleted, guess what? More sanding...


No comments:
Post a Comment